1
Run Wordpress Blog on LAN
Started by
Neon
, Apr 08 2006 07:15 PM
11 replies to this topic
#1
Posted 08 April 2006 - 07:15 PM
Wordpress is a great tool for Bloggers. Imagine that on a Home/Business Network!
Here is my guide on how to do that.
People with Microsoft Onecare or some other firewalls MAY experience problems. AOL users may need to disconnect and reconnect for it to work.
If you don't have a LAN connection make sure your internet connection is active.
-----------
Firstly you need the following tools
Wordpress - Visit Site - Download
xampp - Visit Site - Download
Now install xampp to your computer. The usual install location is C:\program files\xampp. You will be asked if you would like to install any of the components as services somewhere during setup in a pop-up. i'd recommend you say no otherwise your computer gets all the stuff starting when you Log into windows.
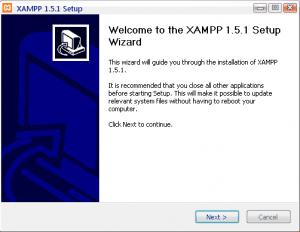
After xampp is installed go to Start > All Programs > apachefriends > CONTROL XAMPP SERVER PANEL
Then press start next to Apache and MySql.
Go to C:\program files\xampp\htdocs (or wherever you installed xampp to) and delete all the files inside the folder htdocs. Then all the files inside the folder extracted from wordpress.zip go into here.
Then open Internet Explorer and type the name of your Computer/LAN IP address/127.0.0.1 into the URL bar followed with phpmyadmin. If i was typing it i would put "amd/phpmyadmin" without quotation marks.
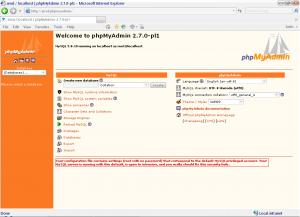
Below where it says create a new database type wordpress (you can choose what you want, but wordpress makes sense) and then click create.
Now either in that Browser window or a new one, type the name of your computer/LAN IP address/127.0.0.1 followed with /wp-admin/setup-config.php and then load that page up. You should see something like whats in the screenshot below. Click where it says let’s go.
Now you have to fill the boxes in on this page. Yours should be the same unless you changed anything earlier. You can alter these by typing the name of your Computer/LAN IP address/127.0.0.1 followed by phpmyadmin. If i was typing it i would put "amd/phpmyadmin" without quotation marks.
Database name = wordpress
Username = root
Password = *leave this blank*
Table Prefix = wp_
Click Submit.
On this page you should see "All right sparky! You've made it through this part of the installation. WordPress can now communicate with your database. If you are ready, time now to run the install!"
Click on the words run the install!
This should start a little Wizard, you run from the First Step choosing your Weblog and entering your e-mail address
The Second Step will appear saying
Now you can log in with the username "admin" and password "******".
Note that password carefully! It is a random password that was generated just for you. If you lose it, you will have to delete the tables from the database yourself, and re-install WordPress. So to review:
Username
admin
Password
*******
Login address
wp-login.php
Were you expecting more steps? Sorry to disappoint. All done!
REMEMBER to take note of the Username and Password given here and then click the link wp-login.php
Once your logged in just set all the stuff from within the control panel there. You can see your Blog by typing the name of your Computer/LAN IP address/127.0.0.1
For it to work remember to click Start > All Programs > apachefriends > CONTROL XAMPP SERVER PANEL Then press start next to Apache and MySql.
The control panel looks like this
The Blog
---------
The good news is by typing the name of your Computer OR its LAN IP address you can get this blog from any machine on your network
Feel free to digg this HERE
You can also do a similar thing with b2evolution. Read my guide on that HERE
Here is my guide on how to do that.
People with Microsoft Onecare or some other firewalls MAY experience problems. AOL users may need to disconnect and reconnect for it to work.
If you don't have a LAN connection make sure your internet connection is active.
-----------
Firstly you need the following tools
Wordpress - Visit Site - Download
xampp - Visit Site - Download
Now install xampp to your computer. The usual install location is C:\program files\xampp. You will be asked if you would like to install any of the components as services somewhere during setup in a pop-up. i'd recommend you say no otherwise your computer gets all the stuff starting when you Log into windows.
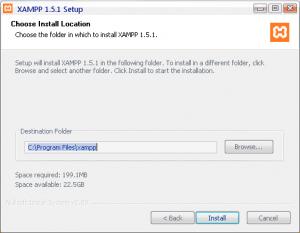
After xampp is installed go to Start > All Programs > apachefriends > CONTROL XAMPP SERVER PANEL
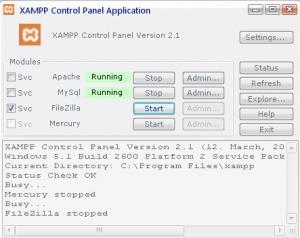
Then press start next to Apache and MySql.
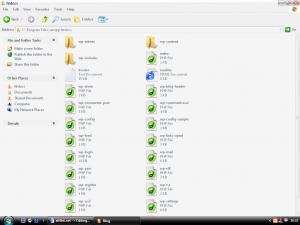
Go to C:\program files\xampp\htdocs (or wherever you installed xampp to) and delete all the files inside the folder htdocs. Then all the files inside the folder extracted from wordpress.zip go into here.
Then open Internet Explorer and type the name of your Computer/LAN IP address/127.0.0.1 into the URL bar followed with phpmyadmin. If i was typing it i would put "amd/phpmyadmin" without quotation marks.
Below where it says create a new database type wordpress (you can choose what you want, but wordpress makes sense) and then click create.
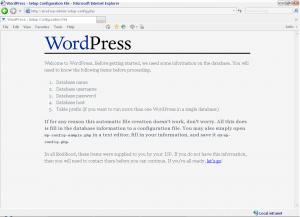
Now either in that Browser window or a new one, type the name of your computer/LAN IP address/127.0.0.1 followed with /wp-admin/setup-config.php and then load that page up. You should see something like whats in the screenshot below. Click where it says let’s go.
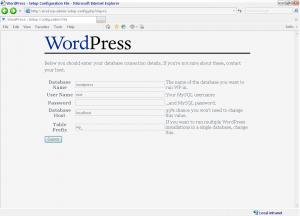
Now you have to fill the boxes in on this page. Yours should be the same unless you changed anything earlier. You can alter these by typing the name of your Computer/LAN IP address/127.0.0.1 followed by phpmyadmin. If i was typing it i would put "amd/phpmyadmin" without quotation marks.
Database name = wordpress
Username = root
Password = *leave this blank*
Table Prefix = wp_
Click Submit.
On this page you should see "All right sparky! You've made it through this part of the installation. WordPress can now communicate with your database. If you are ready, time now to run the install!"
Click on the words run the install!
This should start a little Wizard, you run from the First Step choosing your Weblog and entering your e-mail address
The Second Step will appear saying
Now you can log in with the username "admin" and password "******".
Note that password carefully! It is a random password that was generated just for you. If you lose it, you will have to delete the tables from the database yourself, and re-install WordPress. So to review:
Username
admin
Password
*******
Login address
wp-login.php
Were you expecting more steps? Sorry to disappoint. All done!
REMEMBER to take note of the Username and Password given here and then click the link wp-login.php
Once your logged in just set all the stuff from within the control panel there. You can see your Blog by typing the name of your Computer/LAN IP address/127.0.0.1
For it to work remember to click Start > All Programs > apachefriends > CONTROL XAMPP SERVER PANEL Then press start next to Apache and MySql.
The control panel looks like this
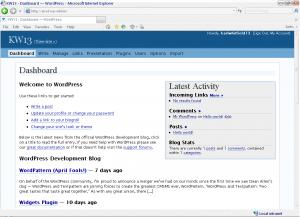
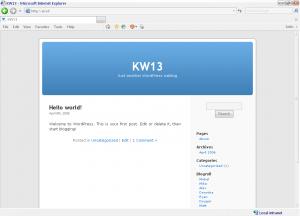
The Blog
---------
The good news is by typing the name of your Computer OR its LAN IP address you can get this blog from any machine on your network
Feel free to digg this HERE
You can also do a similar thing with b2evolution. Read my guide on that HERE
#2
Posted 08 April 2006 - 08:20 PM
Damn thats a brillent guide, now anyone can have their own blog. Thank you Neon
#3
Posted 08 April 2006 - 09:08 PM
thanks lino, i just hope folks like it
if ya get any problems just ask!
#4
Posted 08 April 2006 - 09:43 PM
in server 2003 enterpirse how do you get it so ppl outside of your network can connect
#5
Posted 08 April 2006 - 09:47 PM
I think it might be related to the Internet Security features in Server.
Go to start, control panel, add/remove programs and then add/remove windows components. Scroll down to Internet Explorer Enhanced Security Configuration. Click on Details and uncheck both boxes.
This MAY NOT work, i will install server sometime and try it myself. what version you on?
Go to start, control panel, add/remove programs and then add/remove windows components. Scroll down to Internet Explorer Enhanced Security Configuration. Click on Details and uncheck both boxes.
This MAY NOT work, i will install server sometime and try it myself. what version you on?
#6
Posted 08 April 2006 - 10:17 PM
Enterprise... no worries I was joking about that, I uninstalled server 2k3 any way and installed 5308 I got a rating of 1 with a 32 mb card and 256 mb of ram ROFL
#7
Posted 08 April 2006 - 10:19 PM
Ok no problem. Anything to help
1 is the lowest rating
#8
Posted 08 April 2006 - 11:06 PM
yeah I was surpirsed it even installed and ran O.o
but any way I think I will use the server version of Vista on my new server
#9
Posted 08 April 2006 - 11:22 PM
great guide!
been working with wordpress integrated with joomla.
btw,.. im a joomla freak.
just reminded me to edit my profile.
thanks for the great guide.
very handy to newbies.
- g
been working with wordpress integrated with joomla.
btw,.. im a joomla freak.
just reminded me to edit my profile.
thanks for the great guide.
very handy to newbies.
- g
Edited by guilliam, 08 April 2006 - 11:26 PM.
#10
Posted 09 April 2006 - 01:00 AM
Nice guide! I have to testify to XAMPP, have used it before to run many web based apps from my computer before and it is easy to use. I like the blog idea, could be great for a network at work. I know how fun it is to share stories about strange customers or talk about the hot women!
#12
Posted 10 April 2006 - 05:14 PM
Rev's glad I gave him the software
1 user(s) are reading this topic
0 members, 1 guests, 0 anonymous users